I've been contemplating the effort of maintaining a Devlog while actively working on a project outside of work hours. Games already take a monumental amount of work, particularly in areas where I'm less proficient, like art. But I think there is value in recording this process, both to share my experience with others (which is why I largely make games) but also to look back as a marker of progress.
Zap v0.1 Feedback
Zap v0.1 was my proof of concept build, it was designed to validate the game idea and "fail fast" (despite my lack of interest in that term). Compared to my last attempt at an "artsy" game (Hope) I'd received more views and more plays of my extremely rough prototype. All with that being behind a secret link. The initial version was promising but I cut a lot of corners to get something out and in the hands of players. The overwhelming feedback was that the game needed to respond more to the player and that the current puzzles didn't really feel like puzzles because you could click through most of the demo without knowing what you were doing.
Defining Scope
It's very easy to get carried away and want to solve everything at once. Part of my approach to this game, unlike my past games, is to make it openly, both by sharing early builds but also streaming it's development. I want to see how making games with regular and consistent feedback changes the end product, rather than my usual approach of working on something in isolation and then releasing it into the world and hoping it's enjoyable. Although on the surface it felt like I only had two main areas to focus on I knew that this meant a few things:
- The lack of player feedback was so jarring it was preventing people from providing feedback for anything else.
- That the puzzles were partly inaccessible because there was no player feedback.
I'm also cautious of changing two things at once, so while Zap v0.2.0 is the "Animations Update" it really aims to be a first pass on solving this problem, I will doubtless iterate on this in the future.
Addressing The Issue
I mentioned above that I took shortcuts to get a demo out. That may have been a bit of an understatement. Generating a level involved me exporting the entire puzzle as a large full-screen image, the level manager then placed the appropriate interactive elements, but the connectors were all static. Naturally in an environment where we want to be adding player feedback and a feeling of alive-ness to our game this isn't going to be suitable.
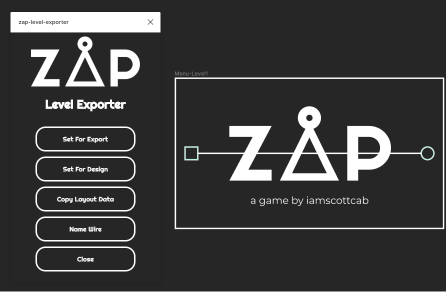
My pipeline for this game is pretty.....weird? I've never loved the way snapping to objects works in Unity, and generally speaking I've found quick prototyping really difficult in the editor for this sort of stuff. I knew I'd need to be able to build a level (essentially dynamically) because I would want to be able to do things like animate the wires. My solution was to make an exporter to Figma so that I could design entirely in vectors (which seem somewhat manageable for me) while maintaining all the benefits of great snapping and other tools that a proper design program gives.
The exporter works really well, it has some caveats but my design philosophy with this game is to apply pragmatism in healthy doses and really aim to solve the 80%. Deal with the 20% if it becomes a problem. The first pass I attempted to use Unity's Line Renderer, after all I had the relevant points being exported from Figma, what could possibly go wrong?

It turns out a lot can go wrong, but in general moving from sharp acute corners to ones with a radius caused the line renderer to pinch. In such a minimal game these sorts of things stick out. Time to try generating my own mesh. In short my first version of dynamic mesh generation had the same problem (perhaps unsurprisingly). This is where iteration can become frustrating and you just have to give into the process. By now I'd essentially rewritten the entire "game" part of the game. My puzzle generator and Figma exporter were still fine but my level generator, and the way the prefabs interacted with it kept getting significantly overhauled just to replicate a static image that was working fine.
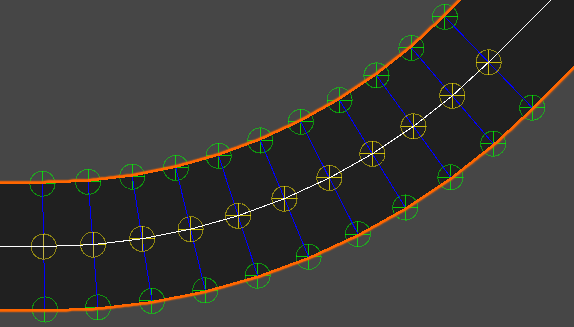
With custom solutions comes custom tooling. It's taken a while but I can debug a bunch of things on my custom meshes now, including vertex placement, normals, even the UV coordinates of a vertex if I wish....
Honestly, this was a frustrating pursuit and raised a number of problems I didn't expect when I started but I was finally at a point where the game looked and behaved exactly the same way as it did a few weeks ago.......great 😡
Providing Feedback
Now I have something dynamic I can work on making it respond to player input. Once again this required a lot of iteration and problem solving. The fine balance here is not making it so crude that you get the same feedback as last time, but not so polished that if it doesn't work well you haven't wasted a lot of time. This is something I will continue to work on as the second attempt at this mechanism took longer than I'd expected.
The v1 of this interaction felt really nice. I thought that the pulses were easy to see, they conveyed movement and change without just using colour (which will be important for me later down the track for accessibility) and generally I had a novel solution to making that pulse work for any type of ease, on any type of line. I was proud of the code, but initial feedback from close friends was that this didn't feel like electricity moving down a wire.
v2 of this animation is much more subtle, and probably needs it's own work down the track but seems to better fit into the aesthetic of the game and generally what the player is expecting to see.
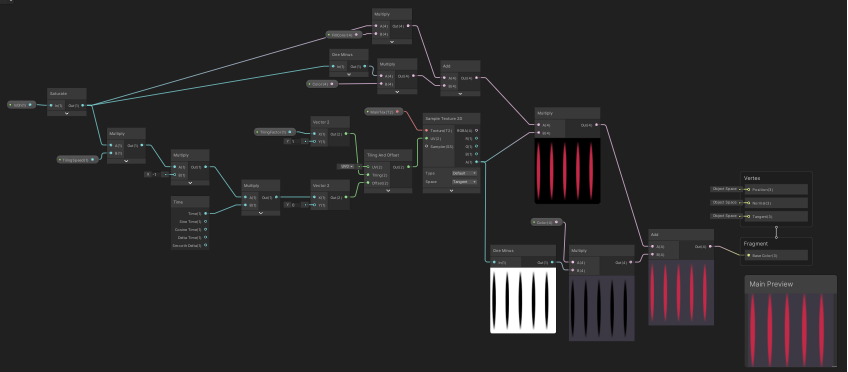
It's been an interesting experience, both to see the game evolve, manage my expectations for rate of change on the game (after all this is a side project) and try new things. When moving to v2 of the mini-pulses I took advantage of trying Shader Graph for the first time. It might be messy, it might be unoptimized, but I made it and that was fulfilling.
Next Steps
If you've made it this far I would love your feedback! My next steps are to take the new and improved animations out into the world and test these on players so I can continue to iterate. In the meantime I am going to start adding the rest of the logic gates I have already created so that I can make more tutorial levels, and some more difficult puzzles so that the next demo is not a re-bundling of the same puzzles. I'd also love v0.3.0 to contain some audio as well to stop a lot of the interactable elements feeling "floaty" or non-responsive.
If you would like to try new versions of Zap as they come out you can do so by following me over at itch.io or support me by buying me a coffee.